
Make these easy diabetic friendly baked wings in the comfort of your own home and say goodbye to the takeout prices! This simple recipe is healthy and sure to become a weekly favorite.
As an Amazon Associate I earn from qualifying purchases, at no extra charge to you. Click here to read my full disclosure.
Most families I know look forward to Friday nights for a traditional pizza night, my family included! But for the past year or so our family has coined Friday nights to be ‘pizza AND wings’ night. It’s a favorite for us all and I’ll be honest, I’ve really enjoyed the routine of it without the meal planning hassle.
Part of the perks of having a pizza and wings takeout night is obviously having a mess-free kitchen at the end of the meal. I get it, some weeks are long. But hear me out- having homemade wings (and pizza!) is easier than you think. This recipe only requires a few ingredients and 4 easy steps. You know exactly what you’re putting on your food so there’s no guessing game of nutritional information. Your dinner will actually be hot, as it won’t have the cool-down drive that no one likes. You’ll also likely cut the price of this meal in half just by making it at home! If you have a large family or a lot of meat eaters in your home, this is very appealing.
What Makes These Wings Diabetic Friendly
Here’s my disclaimer: I’m not a nutritionalist. I am, however, a person who cares about reading food labels and incorporating the healthiest ingredients possible, whenever possible. Over time I have seen ‘added sugars’ on a lot of labels I wouldn’t have expected. Many sauces do contain added sugars, which may be a concern for someone who is keeping an eye on their glucose levels. The “sauce” in this recipe is melted butter + seasonings. There is no added sugar, which in my opinion qualifies this recipe as a healthy meal option for diabetics.
How to Make Baked Wings
Be sure to check out the full recipe below to save and print!
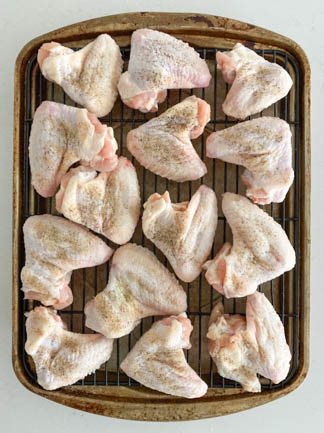
As with any baked recipe, you’ll need a preheated oven. As this is happening prep the wings by laying them out flat on a baking sheet. Sprinkle the wings with salt, pepper and garlic powder. Place them in the oven. Easy enough, right?
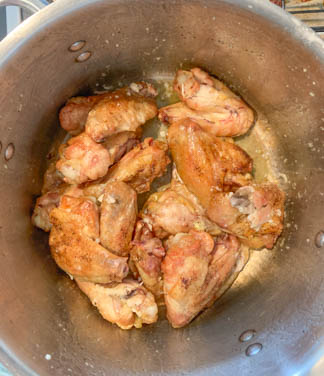
Once the wings are fully baked, melt butter in a large pot and cook the minced garlic for about 2 minutes. Turn off the heat, put wings in the pot of melted garlic butter, place a lid on the pot and shake ’em all around.
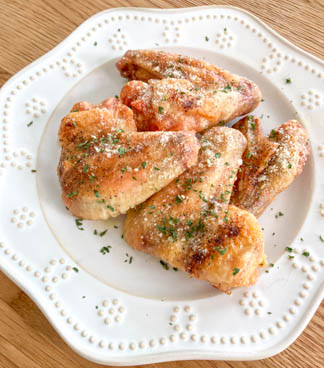
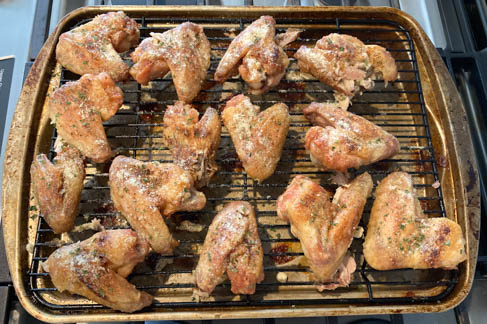
Lay the wings flat again on the baking sheet and sprinkle with grated parmesan cheese and fresh parsley (optional). That’s it! Hot from the oven, ready to eat, healthy baked chicken wings have been served.
Considerations For Baked Wings
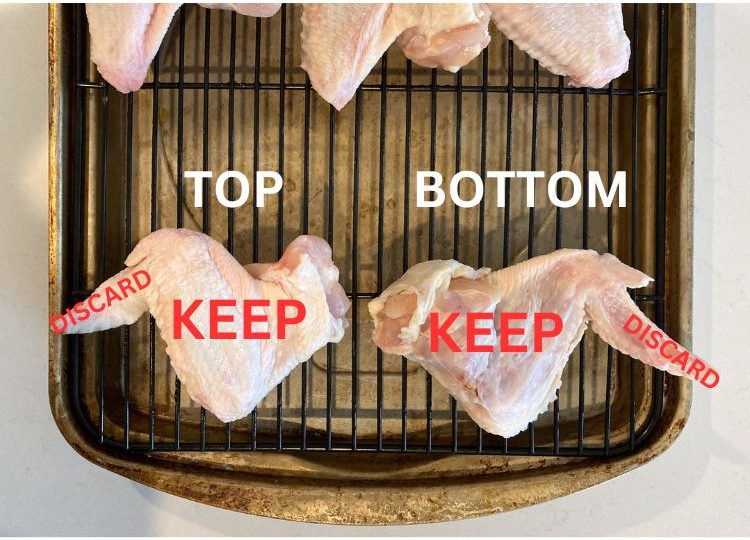
Depending on where you get your wings from you may have to clip the tips yourself. Don’t let this scare you, once you get a feel for what you’re doing it will be a breeze! All you need is a cutting board and sharp knife or kitchen shears. The tips can be clipped before or after baking. If you get your wings from a local butcher you can ask them to do this for you to save an extra step. See the picture below to reference the drumette, flat (keep) and the tip (discard).
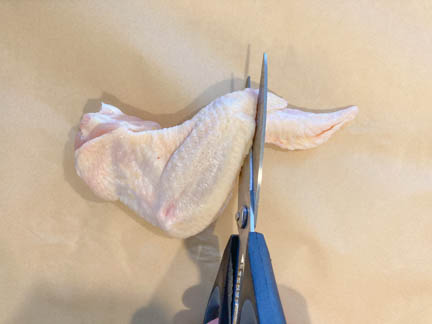
Spread the wings out a bit so you can get a better grip with the kitchen shears. Place the shears on the joint shown below and cut. Don’t force the shears, as this can break them. Rather, slightly move the kitchen shears in this spot while cutting to feel for the weak point. Once you feel the blades cut in, make a full cut with the kitchen shears until the tip is detached. Feeling for this will get easier with practice!
Another thing to consider is the type of baking sheet being used. A baking sheet with a rack will allow air to flow all around the chicken wings and produce both a crispy top and bottom, without the need to turn them. Sometimes a regular baking sheet will hold excess liquid and the wings will need to be turned halfway through cooking. I have used both types and the yield is still a delicious result either way.
What to Serve with Baked Wings
A simple side or caesar salad goes great with this recipe and you won’t feel over-stuffed after eating it. Other great options are steamed broccoli, green beans or a mix of your favorite roasted vegetables.
How to Reheat Baked Wings
If you find yourself with leftover baked chicken wings they will keep in the refrigerator for 3 to 4 days. When you’re ready to reheat them the best way to keep the crispness is to use the oven. Preheat oven to 350°F and pull wings out of the fridge to bring to room temperature while you wait. Spread wings out on baking sheet in a single layer and cook 7-10 minutes or until warmed through. Turn halfway through if you can remember ;).
Equipment Needed for Baked Wings
- Kitchen Shears or Sharp Knife
- Baking Tray with Rack or Large Baking Sheet
- Meat Thermometer, optional
- 6QT Pot With Lid
- Garlic Mincer
- Tongs
If you try these easy diabetic friendly baked wings and love them, I’d love for you to come back and rate it 5 stars! You can also tag me on Instagram @crimsonstonehome
Easy Diabetic Friendly Baked Wings
Ingredients
- 1 tsp extra virgin olive oil
- 1/4 tsp salt
- 1/4 tsp pepper
- 1/4 tsp garlic powder
- 1 stick butter
- 3 cloves fresh garlic, minced
- grated parmesan cheese for serving
- fresh parsley optional, for serving
- 4 lbs raw chicken wings not frozen
Instructions
- PREP Preheat oven to 450℉. Lightly oil baking sheet with olive oil. Assemble wings on baking sheet and sprinkle with salt, pepper and garlic powder.1 tsp extra virgin olive oil, 1/4 tsp salt, 1/4 tsp pepper, 1/4 tsp garlic powder, 4 lbs raw chicken wings
- BAKE Bake wings uncovered for 50-60 minutes, until skin is crispy and internal temperature reaches 165℉. *Oven temps vary, check after 45min.
- Toss Heat butter in a large pot over medium high heat. Add minced garlic and cook for 1-2 minutes (don't let it burn). Turn off heat. Add cooked wings to pot, cover with lid and toss.1 stick butter, 3 cloves fresh garlic, minced
- Final Touches Using tongs, remove wings from pot and spread out on baking sheet. Sprinkle with grated parmesan cheese and fresh chopped parsley if desired.grated parmesan cheese, fresh parsley
- ENJOY!
Leave a Reply